• Holiday Cheese Ball - Glory Kitchen

    HOLIDAY CHEESE BALL

    This Holiday Cheese Ball is the perfect appetizer for upcoming parties and gatherings.  It is always a hit because really, who doesn’t love creamy cheese loaded with crunchy flavor?  The best part about this appetizer is threefold: first, it is made with only three ingredients; second, it takes no time at all to put together, and finally, you can make it ahead and serve at room temperature when guests arrive.  That is what I call perfect party fare.

    I call this a Holiday Cheese Ball because it seems so appropriate for winter party gatherings but don’t be fooled by the name, it is just as good served at all times of the year.  For spring or summer seasons I would pair it with sweet strawberry, peach, or blackberry jam but during the Christmas season I love serving this spicy and flavorful Holiday Cheese Ball alongside a cranberry compote or fig jam.  The sweet, fruity jam, the creaminess of the cheese, and the pungent notes of seeds and herbs from the Indian flavors of our Mumbai nut & spice mix make for a tasty combination.

    This Holiday Cheese Ball is made by mixing cream cheese and Monterrey Jack cheese, then crusted with our spicy Indian nut mix, but all flavors of our Glory Kitchen nut & spice mixes work beautifully crusted on a cheese ball.

    For a different twist you could try a mix of cream cheese and Manchego or Queso Fresco and then crust it with our Mexican flavors of San Miguel nut & spice mix.  Or take it in a Mediterranean direction with a cream cheese and feta combination crusted with our Cairo nut & spice mix.  Another fabulous cheese combination (and one I make often) is cream cheese and goat cheese crusted with our Provence nut & spice mix.  There are so many combinations; each one has its own delicious flavor twist and they make a lovely presentation crusted in colorful seeds, nuts, herbs and spices.

    I like to make the cheese ball ahead, refrigerate wrapped in plastic wrap, then serve at room temperature when the guests arrive so the cheese is soft and creamy for spreading.  My favorite pairing is with fresh baguette slices but any type of cracker works perfectly as well.

    With our Glory Kitchen spice blends on hand, you’ll always be ready to throw together a true crowd-pleasing appetizer.  You don’t even need a recipe.  It’s just that simple.

    Margie Bruner - Glory Kitchen

    Margie Bruner
    owner of Glory Kitchen

    instagram
    facebook

    Holiday Cheese Ball

    Yield: about 6-8 persons

    Ingredients

    • about 1/4 cup Mumbai nut & spice mix
    • 1 block (8 ounce) cream cheese
    • 1 block Monterrey Jack cheese, shredded
    • fresh parsley, for garnish
    • 1 jar cranberry jam or preserves (also would be great with fig jam, strawberry jam, or blackberry jam)
    • crackers or slices of fresh baguette

    Instructions

    1. In a large mixing bowl, combine the cream cheese and Monterrey Jack cheese until they are incorporated well. I like to use my hands to get it well mixed together. Form into a ball.
    2. Take the Mumbai nut & spice mix and sprinkle it out onto a flat countertop, cutting board, or flat surface. Take the cheese ball and press it down firmly into the Mumbai nut & spice mix to crust the exterior of the ball. Move it around and continue pressing the cheese into the nut mix until the entire ball is completely covered in the blend. Wrap the cheese ball with plastic wrap and store in the refrigerator until ready to serve.
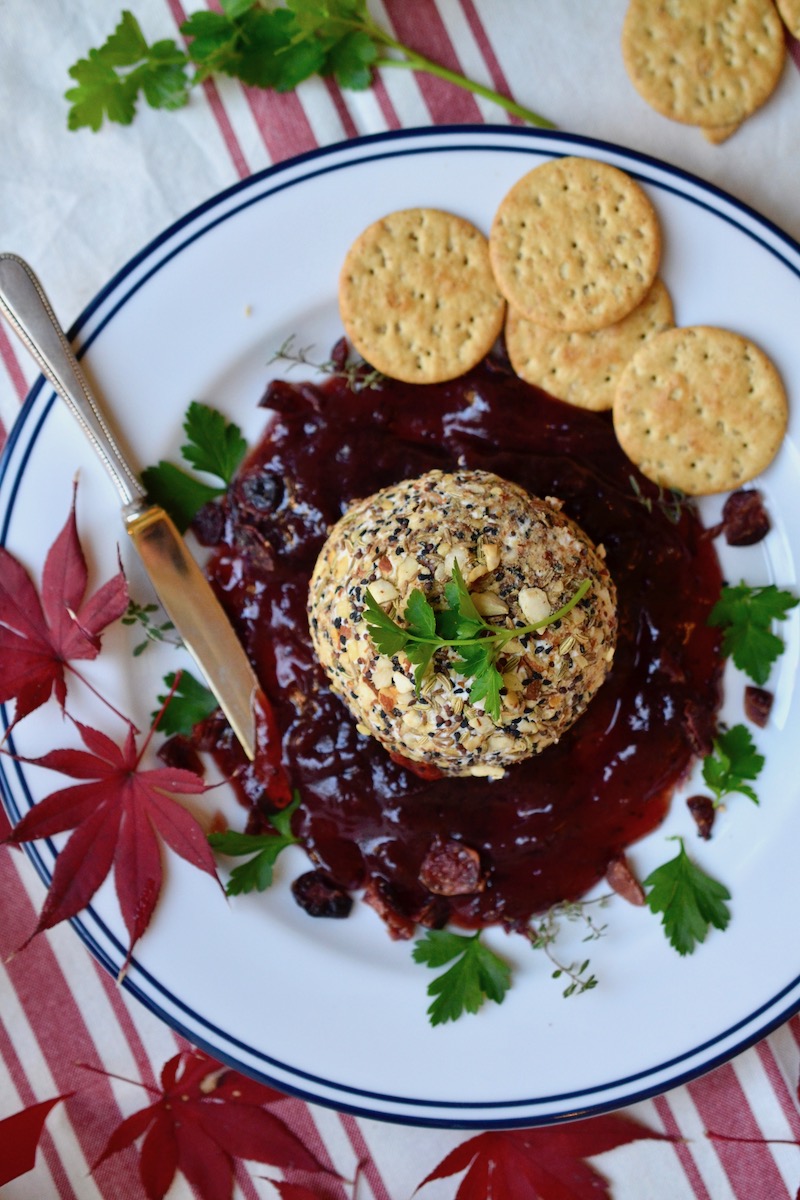
    3. I like to bring the cheese to room temperature before serving so it is creamy and easy to spread. Place the ball into the center of a serving dish and spoon a seasonal jam (I love cranberry at Christmas time but fig is delicious as well) all around the base of the cheese ball. Serve with slices of fresh baguette or with your favorite crackers.

    Holiday Cheese Ball - Glory Kitchen
    Holiday Cheese Ball - Glory Kitchen
    Holiday Cheese Ball - Glory Kitchen
    Holiday Cheese Ball - Glory Kitchen
    Holiday Cheese Ball - Glory Kitchen
  • Butternut, Brussels, and Walnut Salad with Tangerine Dressing -Glory Kitchen

    BUTTERNUT, BRUSSELS, & WALNUT SALAD

    This Butternut, Brussels, and Walnut Salad with a Tangerine Vinaigrette is a delicious way to ring in the fall season.  It’s everything tasty about fall tossed together into one big bowl and it has all types of flavor –  roasted squash, crunchy brussels sprouts, tart cranberries, nutty walnuts, and creamy goat cheese.  This combination of ingredients makes a mighty flavorful salad that you’ll want to repeat over and over.  I’ve already made this salad twice and I’m serving it again for a gathering this week.

    This is a simple recipe but to make it quickly I recommend roasting both the butternut squash and the brussels sprouts the day before and store them in the refrigerator until you are ready to assemble your salad.  The tangerine dressing could also be made ahead and stored in a mason jar in your fridge until you are just about to serve.  My best advice is to roast plenty of butternut squash and brussels sprouts because it is difficult to resist the temptation of snacking on them as they come out of the hot oven… better than candy!

    The dressing has a surprise ingredient of fresh tangerine juice which gives it a bright and citrusy flavor.  A drizzle of honey adds more sweetness but the best part is the surprise pinch of cinnamon and the Indian flavors from our Glory Kitchen Mumbai nut & spice mix.   This recipe will make plenty of dressing  so you may have some leftover for drizzling on raw veggies later or even to use as a marinade for salmon.  Hope you enjoy this Butternut, Brussels, and Walnut Salad with a Tangerine Vinaigrette as much as I have.

    Margie Bruner - Glory Kitchen

    Margie Bruner
    owner of Glory Kitchen

    instagram
    facebook

    Butternut, Brussels, & Walnut Salad with a Tangerine Vinaigrette

    serves about 6 salads

    Ingredients

      For the dressing:
    • 1 teaspoon Mumbai nut & spice mix
    • 1/2 cup olive oil
    • 1/4 cup white wine vinegar
    • 1/4 cup tangerine juice, fresh squeezed
    • 1/2 cup greek yogurt
    • 1/4 cup organic mayonnaise
    • 1 teaspoon honey
    • good pinch of salt
    • good pinch of cracked pepper
    • good pinch of cinnamon
    • For the salad:
    • 1 butternut squash, cubed & roasted
    • 3-4 cups brussels sprouts, quartered & roasted
    • romaine lettuce, chopped
    • arugula lettuce
    • 1/2 cup (or less) dried cranberries
    • 1/2 cup goat cheese crumbles
    • 1 cup walnuts, toasted & coarsely chopped
    • extra Mumbai nut & spice mix
    • for topping

    Instructions

      dressing:
    1. Place all of the dressing ingredients into a small mason jar and shake very well until it is completely emulsified together. Taste the dressing and adjust the seasonings. You may want to add a bit more honey if you prefer it a bit sweeter.
    2. salad:
    3. Peel and cube the butternut squash and place onto a baking sheet lined with parchment paper. To allow for easier peeling & slicing I like to place the entire butternut squash into the microwave and run it for 5 minutes or so, on high. Remove and allow to cool a bit. Cut in half, cut the ends off, then peel. Slice each piece in half, clean out the cavity with a spoon (I like to use a grapefruit spoon which has serrated edges). Then slice the butternut and cut into cubes. Drizzle the cubed squash with olive oil & sprinkle with sea salt. Place into a hot 450° oven for about 30 minutes or until the squash is a bit browned on the edges. Remove and cool completely. This can be done the day before and stored in the refrigerator.
    4. Take the brussels sprouts and cut off the ends, slice them into quarters then place on a parchment lined baking sheet and do the same as you did the squash; drizzle with olive oil, sprinkle with a pinch of sea salt, and throw into a hot oven, 450°, for a bit less time than the squash. You don't want to burn them so keep a close eye on your oven. I like to bake both sheets of vegetables at the same time. I also like to do this step well before I plan on assembling the salads.
    5. Slice up your romaine lettuce & toss together with the arugula (about equal parts of each). I typically like to toss them together with just a bit of dressing to lightly dress the lettuces but only use a bit so they don't wilt.
    6. Add the lettuces to each individual bowl or plate, top with butter nut squash, brussels sprouts, & dried cranberries. Top with toasted walnuts & goat cheese crumbles. You can finish with an additional sprinkle of Mumbai nut & spice mix.
    7. Serve the salads with the dressing on the side.

    Notes

    This dressing would also be wonderful with our Cairo, San Miguel, or Provence nut & spice mix.

    Butternut, Brussels, and Walnut Salad with Tangerine Dressing -Glory Kitchen
    Butternut, Brussels, and Walnut Salad with Tangerine Dressing -Glory Kitchen
    Butternut, Brussels, and Walnut Salad with Tangerine Dressing -Glory Kitchen
    Butternut, Brussels, and Walnut Salad with Tangerine Dressing -Glory Kitchen
    Butternut, Brussels, and Walnut Salad with Tangerine Dressing -Glory Kitchen
    Butternut, Brussels, and Walnut Salad with Tangerine Dressing -Glory Kitchen
  • Watermelon and Tomato Salad -Glory Kitchen

    WATERMELON AND TOMATO SALAD

    Watermelon is the epitome of summer to me and it is one fruit I just can’t seem to get enough of.  Until I tasted this refreshing Watermelon and Tomato Salad I never would have thought to combine such a sweet fruit with fresh tomatoes.  The combination is quite a delicious surprise and hits many notes of flavor.

    Let’s begin with the sweet juiciness of watermelon, then add tomatoes, which I typically think of as a savory vegetable (even though it is botanically considered a fruit), add the saltiness of feta cheese crumbles, then toss it all together with fresh herbs and a light vinaigrette seasoned with our Mediterranean inspired nut & spice mix, called Cairo.

    I grow lots of herbs in my garden and chose to use fresh oregano in this salad to give it a peppery herb flavor but other herbs which would also work beautifully in this salad are fresh basil, cilantro, mint, or flat leaf parsley.  When mixing together the ingredients for the vinaigrette, it is important to taste as you go and adjust the seasonings to your own preferences.  I would be careful with the salt because of the existing saltiness of the feta cheese and you can certainly omit the honey if your watermelon is already super sweet.  The crunch and spiciness of the Cairo nut & spice mix is a wonderful surprise note of flavors; just a touch of fennel & cumin flavor gives it real interest.

    This is a refreshing salad combining two summer favorites – watermelon and tomato.  If you never thought these two would pair well, it’s time to give it a try.

    Margie Bruner
    owner of Glory Kitchen

    instagram
    facebook

    Watermelon and Tomato Salad

    Yield: serves 3-6

    Ingredients

    • Cairo nut & spice mix
    • 3 cups cherry tomatoes, preferably in season & locally grown
    • 3 cups watermelon, cubed & seedless
    • 1/3 cup feta cheese, crumbled
    • 1 tablespoon olive oil
    • 3/4 tablespoon lemon juice, fresh
    • 1 teaspoon honey
    • pinch of salt
    • 1/4 cup oregano, fresh & chopped

    Instructions

    1. Slice the cherry tomatoes in half and place into a large bowl along with the cubed watermelon.
    2. Whisk together the Cairo nut & spice mix, olive oil, lemon juice, pinch of salt, & honey.
    3. Add to the tomato & watermelon mixture, as well as the fresh oregano and feta cheese crumbles. Toss gently, taste and adjust seasonings, and serve.

    Notes

    The Mumbai nut & spice mix would also work well with this salad.

    Watermelon and Tomato Salad -Glory Kitchen
    Watermelon and Tomato Salad -Glory Kitchen
    Watermelon and Tomato Salad -Glory Kitchen
  • Chicken Thighs with Honeydew and Cucumber Salsa - Glory Kitchen

    CHICKEN THIGHS WITH HONEYDEW AND CUCUMBER SALSA

    Chicken Thighs with Honeydew and Cucumber Salsa is the ultimate summer meal.  It is light, fresh, spicy, a little sweet and a little savory.  Talk about a feel-good meal!  I love the hues of green from the honeydew, the english cucumber, the jalapeño, and the cilantro.  This chicken dish has all kinds of flavor components going on; sweet, spicy, salty, and smoky flavors from the cumin, coriander, and sesame seeds of our Glory Kitchen Cairo nut & spice mix.

    Summer freshness oozes out of this dish filled with juicy fresh fruit, garden herbs, and vegetables.  You can pile the salsa on high to get plenty of flavor on a nice tender piece of chicken.  After a quick marinade, the chicken is pounded thin with a meat mallet between two pieces of plastic wrap which helps it to cook evenly and quickly.  With this quick-cook process, the chicken stays perfectly fork tender.  Once pounded and marinated, I grilled the chicken thighs but an oven can get the job done just as easily.  I would probably broil them just a bit at the end to get a bit of color on the top.

    If you like things spicy you can certainly add more jalapeño than the recipe calls for – even a bit more onion would have added additional heat.  The salsa can be made a few hours before serving.  Even the chicken could be baked beforehand and warmed up just a bit or served at room temperature.  I think this chicken dish makes a beautiful presentation with all of the pretty green colorations so take advantage of the wow factor and serve it on a large platter.  Enjoy!

    Margie Bruner
    owner of Glory Kitchen

    instagram
    facebook

    Chicken Thighs with Honeydew and Cucumber Salsa

    Yield: serves 4-6 persons

    Ingredients

      for the honeydew salsa:
    • 3 cups honeydew, cubed
    • 2 1/2 cups english cucumber, chopped (about 1 large cucumber)
    • 1 cup red onion, chopped
    • 1/2 cup cilantro, fresh, chopped
    • 1 large jalapeño, minced
    • 1 tablespoon lime juice, fresh
    • 2 tablespoons olive oil
    • 1 teaspoon honey
    • 1 teaspoon Cairo nut & spice mix
    • 1/2 teaspoon sea salt
    • for the chicken:
    • 6 chicken thighs
    • 1/4 cup lime juice, fresh squeezed
    • 1/4 cup olive oil
    • 1/8 cup soy sauce
    • 1 tablespoon dijon mustard

    Instructions

    1. In a large mixing bowl, mix together the chopped honeydew, cucumber, onion, cilantro, jalapeño, 1 tablespoon lime juice, olive oil, honey, 1 teaspoon Cairo nut & spice mix, and sea salt. Stir together and set aside to marinade the flavors at room temperature.
    2. Allow the chicken thighs to come to room temperature then place the thighs between two large pieces of plastic wrap and pound them with a meat mallet (also called a meat tenderizer) to flatten so they become thin and even. Place the pounded chicken into a large bowl and add the marinade of 1/4 cup lime juice, 1/4 cup olive oil, soy sauce and dijon mustard. Toss them in the marinade and let them sit for about 10 minutes. At this point you can remove them from the marinade and place them on a hot grill to cook through. Alternatively, you can place them into a baking dish, along with the marinade, and bake in a 350° oven for about 25 minutes until it is cooked through. Be careful not to overcook because the chicken has been pounded thin and will cook more quickly. Just before removing from the oven, I like to set them under the broiler for a few moments to brown the tops.
    3. Place the thighs on a serving platter and spoon the honeydew cucumber salsa over the chicken. Sprinkle with a bit more 1 teaspoon Cairo nut & spice mix and serve.

    Chicken Thighs with Honeydew and Cucumber Salsa - Glory Kitchen
    Chicken Thighs with Honeydew and Cucumber Salsa - Glory Kitchen
    Chicken Thighs with Honeydew and Cucumber Salsa - Glory Kitchen
    Chicken Thighs with Honeydew and Cucumber Salsa - Glory Kitchen
    Chicken Thighs with Honeydew and Cucumber Salsa - Glory Kitchen
    Chicken Thighs with Honeydew and Cucumber Salsa - Glory Kitchen
    Chicken Thighs with Honeydew and Cucumber Salsa - Glory Kitchen
    Chicken Thighs with Honeydew and Cucumber Salsa - Glory Kitchen
  • Freekeh, Red Lentil and Roasted Veggie Bowl

    FREEKEH, RED LENTIL, AND ROASTED VEGGIE BOWL

    This bright and colorful Freekeh, Red Lentil and Roasted Veggie Bowl incorporates unique flavors from countries far and wide.  I used a Middle Eastern grain called Freekeh (pronounced “free-kah”), often considered a supergrain, and made from green durum wheat.  Freekeh is popular in Middle Eastern cuisines and can be compared to farro or brown rice but often greenish in color.  The texture of the grain is not smooth and rounded like that of rice and farro but is a bit frayed on the edges.  Freekeh is a popular grain often seen in Egypt, Syria, Tunisia and Jordan but it is gaining popularity and becoming more familiar here in America.  It can now be found in many popular grocery stores.

    This Freekeh, Red Lentil and Roasted Veggie Bowl recipe incorporates lentils and the pretty red leaves of shredded radicchio, tossed in for color and a for a subtle bitter note.  Adding to the colorful dish, cauliflower is roasted and seasoned with turmeric and our Glory Kitchen Mumbai nut & spice mix to create a bright yellow color and robust flavor.  The cauliflower had a delicious flavor and would make a terrific side dish on its own.  I also added roasted broccoli, a family favorite, which added a bright green color to this full-flavored dish.

    Although there are several steps to making this dish, none of them are complex, it just takes a bit of time and planning.  You could always make the roasted scallion dressing and roast the cauliflower & broccoli the day before.  Or cook the lentils and freekeh ahead and refrigerate overnight.

    Once all of the prep work is done and each ingredient is placed in its own bowl, it’s just a matter of tossing together and arranging it nicely on a serving plate.  If I were making this for guests I would prepare all of the ingredients ahead, store in the refrigerator, bring them all to room temperature when ready to serve, then toss together.  Hope you enjoy!

    Margie Bruner - Glory Kitchen

    Margie Bruner
    owner of Glory Kitchen

    instagram
    facebook

    Freekeh, Red Lentil & Roasted Veggie Bowl

    Yield: serves 4

    Ingredients

      For the dressing:
    • 1 tsp Mumbai nut & spice blend
    • 1/4 cup extra virgin olive oil
    • 1/8 cup apple cider vinegar
    • 1 bunch fresh scallions, roasted & chopped
    • 1 heaping teaspoon whole grain dijon mustard
    • 1/2 tsp cinnamon
    • 1 tablespoon fresh lemon juice
    • 1-2 teaspoon honey
    • good pinch of salt
    • For the salad:
    • Mumbai nut & spice blend
    • 2 cups uncooked freekeh
    • 1 cup uncooked red lentils
    • 2 cups cauliflower florets
    • 1 teaspoon ground turmeric (or fresh if you have)
    • 2 cups broccoli florets
    • 1 small head radicchio lettuce, torn or sliced into small pieces
    • 1/2 shallot, chopped
    • 1/4 cup fresh parsley, chopped
    • 1/4 cup golden raisins
    • 1/2 cup walnuts, lightly toasted
    • sea salt & pepper

    Instructions

    1. Heat the oven to 420ºF. Line 2 baking sheets with parchment paper or aluminum foil. Spread the cauliflower onto one of the baking sheets, drizzle with olive oil, turmeric, sea salt and 2 teaspoons Mumbai nut & spice blend. Toss together well, spread the cauliflower out onto the sheet and place into the hot oven to roast until golden and caramelized. Remove to cool. This takes about 20 minutes.
    2. On another sheet, add the broccoli drizzled with olive oil, sprinkled with sea salt and tossed. On the other side of the broccoli baking sheet, add the scallions for the dressing (leave whole). Also drizzle the scallions with oil, sea salt and spread out onto the tray alongside the broccoli. Place this tray into the oven and bake until all are caramelized (about 20 minutes). The onions will brown first, so as soon as they are lightly browned, using tongs, remove them from the oven and allow them to cool.
    3. Take the roasted onions and chop into small pieces, add to a mixing bowl. To the onions, add all the ingredients for the dressing. Whisk together and set aside.
    4. Meanwhile, place the lentils and a few pinches of salt into a saucepan and add enough cold water to cover by at least an inch. Bring to a boil, then turn down the heat and simmer until al dente tender, 15 to 20 minutes. Once tender, rinse and set aside.
    5. Cook the freekeh according to package directions and then set aside to cool.
    6. Lightly toast the walnuts in a medium sauté pan and toast over low heat until golden brown. Transfer nuts to a board and coarsely chop.
    7. In a large bowl, toss together the cooled lentils & freekeh, golden raisins, shallots, walnuts, parsley, a good pinch of sea salt, pepper, radicchio (keep a few for garnishing at the end) 1-2 teaspoons of Mumbai nut & spice blend, and 1 tablespoon of the dressing. Toss gently then place some into the bottom of each serving plate or bowl. If serving this on a large platter, place all of the freekeh/lentil mixture onto the platter. Arrange the roasted broccoli and turmeric cauliflower on top of the freekeh. Top with a few more radicchio leaves and extra walnuts & parsley. Serve warm or at room temperature.

    Notes

    Our Glory Kitchen Cairo nut & spice mix would also work well with this beautiful dish. If you can't find freekeh you could always substitute farro, quinoa or brown rice. I used red lentils but of course you could use any type of lentil you have on hand. As always, improvise as you cook! If you don't have an ingredient or have trouble finding, always get creative and substitute with something else.

    Freekeh, Red Lentil and Roasted Veggie Bowl
    Freekeh, Red Lentil and Roasted Veggie Bowl
    Freekeh, Red Lentil and Roasted Veggie Bowl
    Freekeh, Red Lentil and Roasted Veggie Bowl
    Freekeh, Red Lentil and Roasted Veggie Bowl
    Freekeh, Red Lentil and Roasted Veggie Bowl
    Freekeh, Red Lentil and Roasted Veggie Bowl
  • Honey Roasted Carrots - Glory Kitchen

    HONEY ROASTED CARROTS

    When I made my very first batch of our Glory Kitchen nut & spice mix, I created the Middle Eastern blend (now called Cairo) and used it to season a simple batch of oven roasted carrots.  As the hot, caramelized carrots came out of the oven, covered in crunchy spices and nuts, the smell was intoxicating and the flavor was even better – one bite and I was hooked.  Not only were the sweet carrots amazing but the crunchy seasoning that coated them gave them texture and a kick of flavor.

    We proceeded to finish the entire batch of carrots straight from the baking sheet, even before they had the chance to cool from the hot oven.  This simple Honey Roasted Carrot Recipe quickly became ingrained in my memory and became a routine side dish and sometimes snack in our home.  I change the variety of nut & spice mix just to keep things interesting and change up the flavor profile.  These roasted carrots are spiced up with our San Miguel nut & spice mix made of Mexican flavors  – the perfect combination of sweet, savory and a little spicy kick.

    All 6 of our Glory Kitchen varieties are perfect for roasted carrots, it just depends upon your mood of the day and flavor direction you wish to take.  My go-to flavors for carrots are the San Miguel, Cairo, Mumbai and Penang blends.

    Once they’re roasted you can serve them as a side to any protein, top them on salads, dip them in a sauce and eat as an appetizer, add them to a cheese platter, use in rice or quinoa bowls, they’re just plain good on everything.

    Margie Bruner
    owner of Glory Kitchen

    instagram
    facebook

    Honey Roasted Carrots

    Yield: serves 4-8

    Ingredients

    • 1 tablespoon San Miguel nut & spice mix
    • 2-3 lbs carrots
    • 2 tablespoons olive oil
    • 1 1/2 tablespoons honey
    • sea salt
    • 1 teaspoon smoked paprika or ground chipotle

    Instructions

    1. Preheat the oven to 425°.
    2. Prep the carrots by peeling and slicing into sticks, slicing in half, or leaving whole, depending upon how large they are and how you want to present them on the plate. In this photograph I used very small heirloom carrots, however, if they are quite large, I often cut them into sticks (much like french fries), or if they are medium sized, I might slice them in half lengthwise because this can present very well on a plate.
    3. Arrange all of the carrots onto a parchment or foil lined baking tray, close together. Drizzle the carrots with the honey and the olive oil, sprinkle with sea salt, paprika (or chipotle) and the San Miguel nut & spice mix. Using your hands, toss them gently to coat the carrots well. Spread them out on the tray. If the carrots are very crowded, you might want to consider using two trays. If you place them too close together, the carrots will steam a bit and will not brown and caramelize as well... that is the best part!
    4. Place the baking tray into the hot oven and roast for about 40 minutes. You might want to check on them after 25 minutes and toss them around a bit to brown them evenly. Remove from oven and enjoy hot or let them come to room temperature and add them into salads, rice bowls, as a side for proteins or use decoratively over a lovely piece of salmon or baked fish. You can sprinkle them with fresh chopped herbs just before serving.

    Notes

    Once you've made these a few times and get a feel for the ingredient ratios, you can just drizzle the oil and honey and add the seasonings without even measuring.

    Honey Roasted Carrots - Glory Kitchen
    Honey Roasted Carrots - Glory Kitchen
    Honey Roasted Carrots - Glory Kitchen
    Honey Roasted Carrots - Glory Kitchen
  • Peanut Butter and Chocolate Drizzle Cookie Recipe - Glory

    PEANUT BUTTER AND CHOCOLATE DRIZZLE COOKIES

    Chocolate and Peanut Butter are a match made in heaven.  These Peanut Butter and Chocolate Drizzle Cookies topped with a little sprinkle of our Glory Kitchen Cairo nut & spice mix are delicious tasting cookies with a surprise note of unique flavors. The finishing touch of crunchy sesame seeds, pepper, fennel, and almonds from the nut blend takes the ordinary cookie to an elevated and sophisticated level.  This is a peanut butter cookie recipe to make when you want something with surprise flavors.

    Although I’m not the biggest fan of peanut butter alone, I think my favorite type of cookie might be a peanut butter one paired with a touch of chocolate.  They’re not overly sweet and they have a bit of a chewy, soft center from the nut butter which makes them irresistible.  The drizzle on top adds a bit of flare and of course that chocolatey touch makes the cookie a bit more decadent.  I used dark chocolate, however, they would be equally delicious if you like a sweeter version such as semi-sweet or even milk chocolate.

    And one more thing, I loved these so much I made them a second time and doubled the recipe batch so I could freeze the dough and have some slice-and-bake cookies at anytime our sweet tooth acted up.

    Just take the dough and place it into parchment paper.  Then roll it into a log (just like the shape of slice-and-bake cookies from the grocery store), wrap tightly in plastic wrap and freeze.  When you’re ready to bake, defrost just a bit and slice your cookies for a quick and easy fresh baked cookie.

    Margie Bruner
    owner of Glory Kitchen

    instagram
    facebook

    Peanut Butter and Chocolate Drizzle Cookies

    Ingredients

    • Cairo nut & spice mix
    • 2 ½ cups 100% whole wheat flour
    • ½ teaspoon baking soda
    • ½ teaspoon baking powder
    • ½ teaspoon salt
    • ½ pound (2 sticks) butter, room temp.
    • 2 cups brown sugar, dark or light
    • 1 cup creamy peanut butter
    • 2 large eggs
    • 2 teaspoons vanilla extract
    • 3/4 cup dark chocolate bits or chips

    Instructions

    1. Heat oven to 350° and set the rack in the center of the oven. Sift together flour, salt, baking soda & powder and set aside.
    2. Beat the butter until it is creamy. Add the sugar and beat together until it is creamy. I used 1 cup organic sugar and 1 cup coconut palm sugar. Add the peanut butter and continue to beat to combine. Add in eggs, one at a time, followed by the vanilla. Turn the beater on low and add in the flour mixture which was set aside earlier.
    3. Using tray with a silpat liner (a washable liner used for easy removal in baking), or a parchment lined baking sheet, scoop out dough a bit smaller than the size of a golf ball - I like to use a very small ice cream scoop to achieve a consistent size for the entire batch. Place them about two inches apart on the baking sheet. After they are all scooped, using a fork, dip the fork into a glass of cold water and then using the back side, press the dough to make the tongs imprint. Then turn the fork and repeat the imprint so it makes a crisscross on the surface of each cookie.
    4. Bake at 350° until the cookies are ever-so-slightly browned, about 15-18 minutes. Each oven temperature is a bit different, so keep an eye out and make certain they do not over cook. Remove from the oven and allow to cool completely. After about 4 minutes out of the oven, I like to transfer them to a wire rack to crisp and cool completely... this allows air to completely circulate around the cookie.
    5. While the cookies are cooling, place the chocolate chips into a small glass mixing bowl and place into the microwave set for 30 seconds. Remove the chocolate and stir well with a wooden spoon. If they do not melt completely while stirring, place back into the microwave and heat for another 15-20 seconds. Repeat this until the chocolate is completely melted (you do not want to overheat the chocolate, just melt enough it so it becomes softened and can be drizzled) Taking a small spoonful and using a quick sweeping motion, drizzle the chocolate over the cookies (placed tightly side by side on the cooling rack or baking sheet) Criss Cross the motion and drizzle in the opposite direction as well. Now sprinkle the tops with a pinch ful of Cairo nut & spice mix. Allow the chocolate to harden and cool completely. Enjoy!

    Notes

    I used dark chocolate for the drizzle, however, if you prefer semi-sweet or even milk chocolate these would be delicious as well.

    This recipe is adapted from the NYTimes.

    Peanut Butter and Chocolate Drizzle Cookie Recipe - Glory
    Peanut Butter and Chocolate Drizzle Cookie Recipe - Glory
    Peanut Butter and Chocolate Drizzle Cookie Recipe - Glory
    Peanut Butter and Chocolate Drizzle Cookie Recipe - Glory
  • Vegetable, Chicken and Orzo Soup - Glory Kitchen

    VEGETABLE, CHICKEN AND ORZO SOUP

    Most everyone loves a brothy, soothing, chicken soup filled with tender vegetables.  This Vegetable, Chicken and Orzo Soup certainly fits the bill.  It is filled with carrots, mushrooms, english peas and tender shreds of chicken.  Instead of the typical noodle, I’ve added orzo, a tiny little pasta shaped like a large grain of rice.  I used orzo just to add a different twist to a traditional soup, however, an egg noodle or even brown rice would be equally delicious in this brothy soup.

    My favorite part of this soup is the surprise element of shiitake mushrooms – the Asian mushroom that has a lovely shape and even better deep, mushroom flavor.  The name “shiitake” hails from Japan, where they cultivated the popular mushroom by cutting logs from “shii trees” and placing them close to existing trees which sprouted shiitake spores.  If you are not able to find shiitake mushrooms at your local market, you can always substitute with a button or other type of mushroom.

    I also like to add the English peas at the very end of the cooking time so they stay bright and plump.  If you boil a pea too long, it becomes dark and shriveled – not pretty!

    And finally, just before serving, give it a finishing crunch by adding an additional sprinkle of Glory Kitchen’s Cairo nut & spice mix.  It adds the perfect peppery flavor and a nice texture on top.  Everyone needs to have a delicious chicken soup in their recipe archives and this one certainly fits the bill.  Serve this soup alongside a grilled cheese sandwich and you’ll have the perfect tummy warming meal.  Enjoy!

    Margie Bruner
    owner of Glory Kitchen

    instagram
    facebook

    Vegetable, Chicken and Orzo Soup

    Ingredients

    • 1 teaspoon Cairo nut & spice mix
    • 2 chicken breasts, skinless
    • 3 carrots, peeled & sliced
    • 3 celery stalks, sliced
    • 1/2 - 1 yellow onion, chopped
    • 1 cup english peas, fresh
    • 1 4oz box shiitake mushrooms, sliced
    • olive oil
    • 32 ounces (1 qt) chicken stock
    • 1/8 teaspoon nutmeg
    • salt & pepper to taste
    • 1 1/2 cups orzo, uncooked
    • 3 cups water

    Instructions

    1. Add a drizzle of olive oil to the bottom of a large, heavy stock pot and heat through. Add the chopped onion and cook until translucent. Add the carrots and celery and cook a few minutes until they soften just a bit. Add all the chicken stock and water to the pot and bring it to a boil. Once the stock is simmering add in the shiitake mushrooms, 1 teaspoon Cairo nut & spice mix, nutmeg, a good pinch of salt and pepper. To the liquid, gently drop in the two chicken breasts, cover the pot, and allow to simmer for 6 minutes. Turn off the heat and leave the chicken resting in the pot of hot stock for 30 minutes. Make certain the lid remains on so the heat stays trapped in the pot. After 30 minutes, remove the breasts from the stock and allow to cool completely. Once cooled, shred the chicken.
    2. Bring the stock back to a simmer, add in the shredded chicken, the orzo and the peas. Cook just until the orzo pasta is al dente to taste and no longer or they will get mushy. Taste for seasoning and add more salt, pepper or nutmeg as needed.
    3. Serve warm topped with a sprinkle of Cairo nut & spice mix and fresh herbs.

    Vegetable, Chicken and Orzo Soup - Glory Kitchen
    Vegetable, Chicken and Orzo Soup - Glory Kitchen
    Vegetable, Chicken and Orzo Soup - Glory Kitchen
    Vegetable, Chicken and Orzo Soup - Glory Kitchen
    Vegetable, Chicken and Orzo Soup - Glory Kitchen
  • Cheesy Potato Gratin - Glory Kitchen

    CHEESY POTATO GRATIN

    A Cheesy Potato Gratin makes for great comfort food.  And who wouldn’t love this dish paired with a roast, baked chicken or a nice grilled steak?  Serving this Potato Gratin alongside a large, crisp salad would also be terrific – the perfect meatless meal.

    Baking a Cheesy Potato Gratin might seem complicated or time consuming, however, it is really an easy process.  Once you’ve made it a couple of times, it is quite easy to commit the process and the primary ingredients to memory so you can whip up a gratin in no time.

    The one thing which made it even more simple was the use of a mandoline to slice the potatoes.  I use a mandoline often for quick uniform slices of all types of vegetables, however, I managed  contently without one for many, many years.  It was only recently that I finally added this gadget to my collection of kitchen utensils.  I  I love using a mandoline, but don’t let the lack of one hold you back.  Making this dish is just as easy using a large kitchen knife to slice the potatoes.

    I’ve seasoned this Cheesy Potato Gratin with our Glory Kitchen Cairo nut & spice mix, a crunchy combination of chopped hazelnuts and Middle Eastern spices.  The black pepper adds a bit of heat and the combination of black & white sesame seeds adds great crunch.  This is a perfect potato side dish for holiday gatherings or it also works well on a cold winter’s night when you’re yearning  for a nice cozy and comforting meal.

    Margie Bruner - Glory Kitchen

    Margie Bruner
    owner of Glory Kitchen

    instagram
    facebook

    Cheesy Potato Gratin

    Ingredients

    • about 1 teaspoon Cairo nut & spice mix
    • 1 1/2 -2 lbs potatoes, I used a medley of purple, red skinned & yukon gold
    • 1-2 tablespoons butter, softened
    • fresh thyme, about 1 teaspoon or more
    • fresh nutmeg, about 1 teaspoon, grated
    • sea salt, about 1 teaspoon
    • 1 cup heavy cream
    • 1/2 cup chicken or vegetable stock
    • 1/2 cup gruyere cheese, shredded
    • 1/4 cup parmesan cheese, grated

    Instructions

    1. Preheat the oven to 425°. Generously butter the base and sides of a deep dish pie plate using the softened butter & set aside.
    2. Whisk together the cream and the chicken stock. Mix together the parmesan and the gruyere cheeses.
    3. Using a mandoline, slice the potatoes about 1/8" thick then layer them into the buttered pie dish overlapping the potatoes and alternating if using a variety of type and color. I begin on the outside edge and build it around in a circular motion. Once the bottom layer is filled, sprinkle the potatoes with sea salt, Cairo nut & spice mix, a bit of freshly grated nutmeg and a sprinkle of fresh thyme leaves. Build the next layer and repeat the process with the same seasonings: salt, Cairo nut mix, fresh thyme, and a light sprinkle of nutmeg. Go for the third layer and do the same until the pan is filled. My pan was able to hold 4 layers but keep going until you fill the dish. Do not overfill the pie dish because you need a bit of room to hold the cream mixture and then top it with a layer of cheese.
    4. Take the cream mixture and slowly pour it over the layers of the potato. It should almost fill the dish. Layer the very top with the cheese mixture and an extra sprinkle of Cairo seasoning, sea salt, nutmeg and fresh thyme. Dot the potatoes with a bit of butter around the top (about 1 tablespoon in total) and then place into the oven. You may want to place a baking sheet underneath the pan just incase it bubbles over. Bake for 40 - 45 minutes or until it is bubbly and the cheese top has lightly browned.
    5. Remove from the oven and let it set for about 10 minutes before serving. This can be made ahead and then warmed later with aluminum foil covering the dish until it is warm and bubbly. Top with a few fresh sprigs of thyme just before serving.

    Cheesy Potato Gratin - Glory Kitchen
    Cheesy Potato Gratin - Glory Kitchen
    Cheesy Potato Gratin - Glory Kitchen
    Cheesy Potato Gratin - Glory Kitchen
    Cheesy Potato Gratin - Glory Kitchen
    Cheesy Potato Gratin - Glory Kitchen
Updating…
  • No products in the cart.

JOIN US !
JOIN
close-link